After successfully connecting the camera to the power and network, you need to connect to it via the Web and make preliminary settings. To connect and pre-configure the camera, you first need to find out its IP address, which is often automatically assigned to the camera by the control router on the network, or it can be the factory one. The factory IP, as well as the login and password can be found in the attached manual for the camera. Let's consider several options for searching and connecting a camera, starting with the preferred one.
1. Setting the IP address and activating the camera using a utility from the manufacturer. Typically, such utilities are bundled with the camera on a disk or are available on the official website of the camera manufacturer. Consider this connection and activation option using the Hikvision camera as an example.
All HIKVISION devices with the latest firmware (IPC version V5.3.0, DVR/NVR version V3.3.0) no longer use the default password. When using these devices for the first time, the user needs to activate the device by forcing a password.
This can be done through the SADP utility (included) As the easiest and most reliable way to activate the camera, I advise you to use the SADP program, you can download it on the official website of the manufacturer.
If you have connected everything correctly, then the program will display a list of all Hikvision devices in our network.
Select the device to be activated in the list of ''Online Devices'';
- Set a new password in the ''Device Activation'' field;
- Confirm new password;
- Press the "OK" button to activate the device.
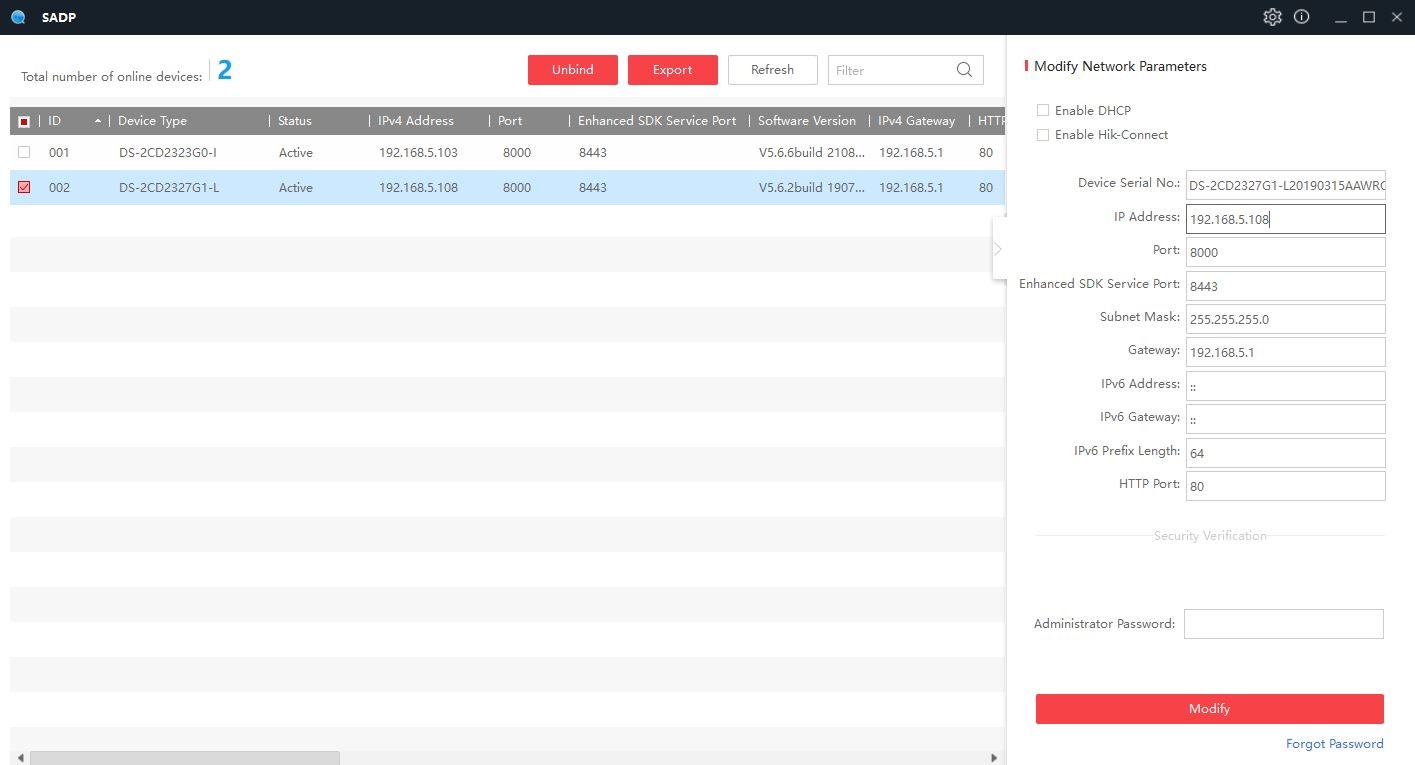
At the same time, in this utility you can immediately set / change the appropriate ip address, gateway, subnet mask for your network.
2. Setting the IP address by means of connecting to the camera via the Web interface. If we know the IP address of the camera, we need to enter it in the browser line and go to its Web interface, then if the camera is not yet activated (for example, this happens with brand new Hikvision and Hiwatch cameras), activate the camera by setting the login and password for administration. After that, log in with the Administrator login and password to the camera, select the settings there and find the menu item "Network" or "Network parameters" - "IP address", select the DHCP assignment option (automatic IP assignment by the network router) or a static IP address to set it manually and prescribe the required parameters of our network.
If the Ip address is unknown, then there are several options for how it will try to calculate:
- The camcorder manufacturer's utility searches for "own devices" by the MAC address of the equipment
- Search for the factory IP address in the manual (instructions)
- Utilities for finding network equipment, such as Collasoft Mac Scanner -Onvif camera search utilities, such as Onvif Device Manager, GOALcity Onvif search when adding cameras.